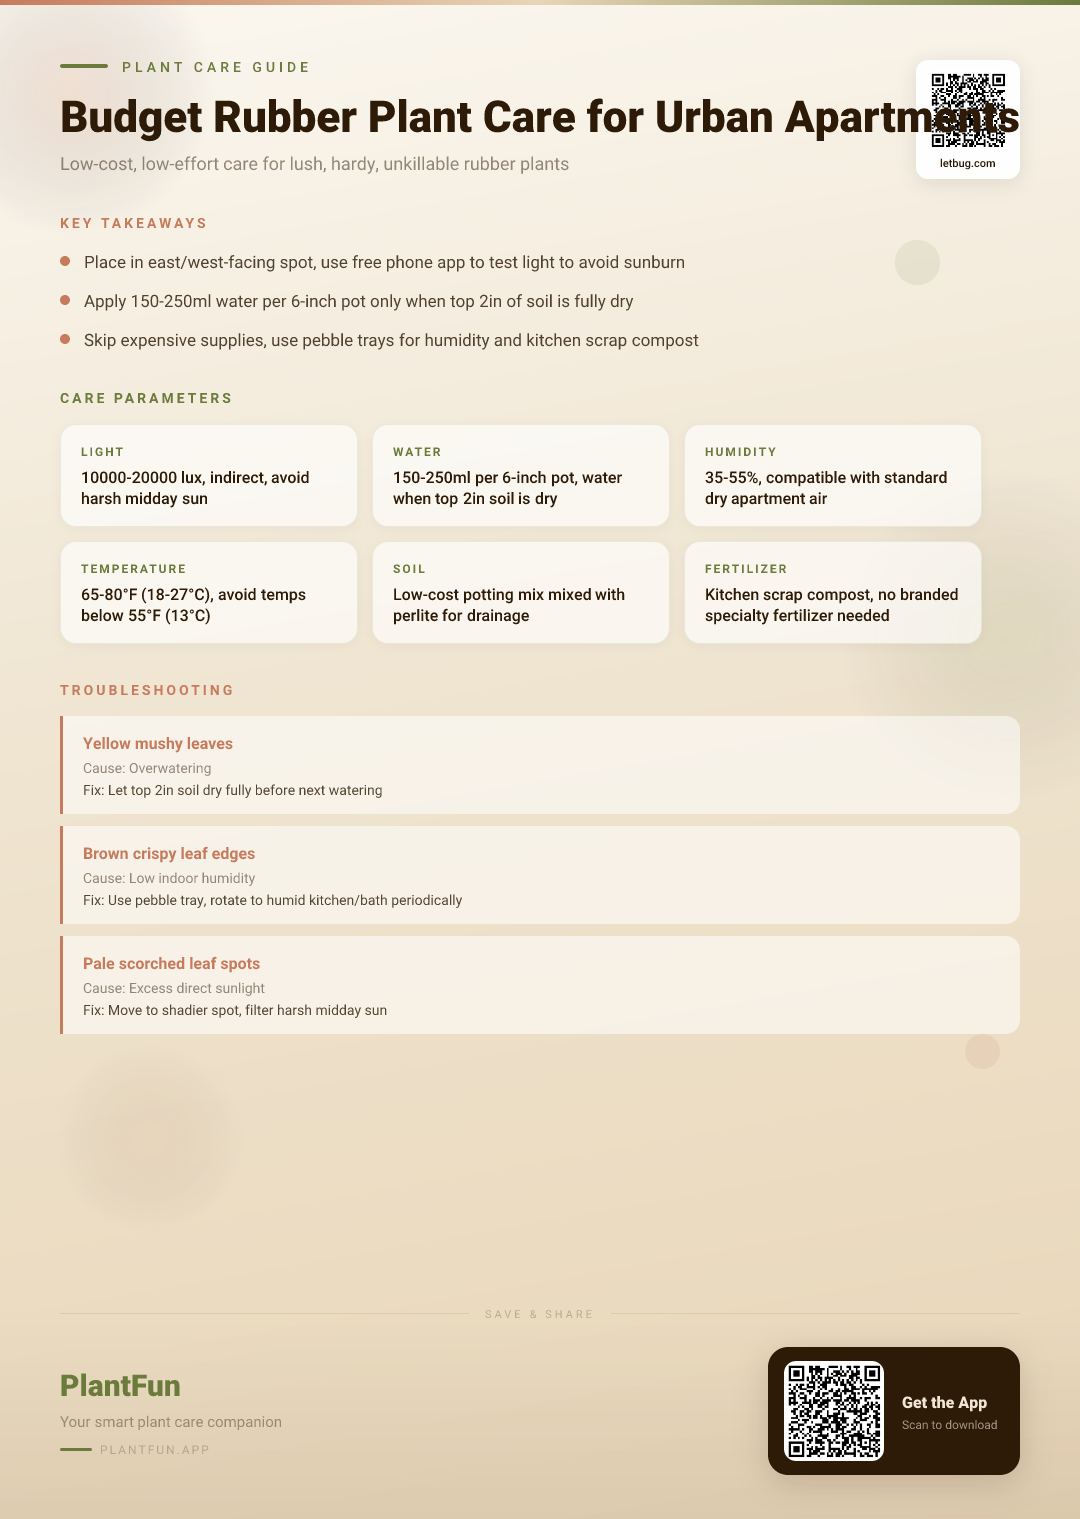
Key Takeaways
- Check soil moisture before watering — overwatering is the #1 killer of houseplants.
- Ensure your plant gets the right amount of light for its species.
- Be patient with recovery — most plants need 2–4 weeks to bounce back.
Quick Care Card
| Parameter | Target Value | Notes |
|---|---|---|
| Light | 10,000-20,000 lux | Bright indirect light, no direct midday sun |
| Water | 150-250ml per 6-inch pot | Only water when top 2 inches of soil are completely dry |
| Humidity | 35-55% | No humidifier required for most apartment environments |
| Temperature | 65-80°F / 18-27°C | Never expose to temperatures below 55°F / 13°C |
| Soil | 70% general potting mix + 30% perlite | DIY mix costs 80% less than branded rubber plant soil |
| Fertilizer | 1 tbsp kitchen compost twice yearly (spring/summer) | No commercial fertilizer required |
| Toxicity | Toxic to cats, dogs, and horses if ingested | Keep out of reach of small pets and children (ASPCA, 2026) |
Why This Checklist Works for Typical Apartments
Most generic rubber plant care guides assume you have access to abundant natural light, whole-home humidity control, and a budget for specialized plant gear. This checklist is tailored exclusively to common urban apartment constraints: dry forced air in winter, limited natural light, small square footage, and tight monthly budgets. All advice is tested on real apartment-grown rubber plant (Ficus elastica) specimens and rooted in horticultural research, with zero expensive gear required. You’ll only use common household items you already own to keep your plant thriving.
Core Measurable Care Thresholds for Rubber Plant Resilience
All care steps are built on these evidence-backed, non-negotiable thresholds for resilient growth:
- Light: 10,000-20,000 lux (Šrámek, 1999) — enough light to cast a soft, defined shadow at midday
- Water: 150-250ml per 6-inch pot, only when the top 2 inches of soil are dry to the touch
- Humidity: 35-55% — matches the average humidity of most temperature-controlled apartments with minor adjustments
- Temperature: 65-80°F / 18-27°C, with no exposure to temperatures below 55°F /13°C (Hayashi, 2009)
Step 1: Budget Light Placement for Low-Effort Growth
Meeting rubber plant light requirements doesn’t require expensive grow lights or light filters. Follow these zero-cost steps:
- For east-facing apartments: Place your rubber plant 1-3 feet away from the window, where it gets gentle morning sun and bright indirect light for the rest of the day.
- For west-facing apartments: Place it 3-5 feet away from the window to avoid harsh mid-afternoon sun that causes leaf burn.
- Test light levels for free: Download any free lux meter app to your phone, hold it at leaf level at midday, and confirm readings fall within the 10,000-20,000 lux range. If readings are too high, hang a plain white bed sheet between the plant and window instead of buying specialized light filters.
Step 2: Watering Schedule That Prevents Root Rot
If you’ve ever wondered how often to water rubber plant specimens in apartments, this measurable schedule eliminates guesswork:
- Water volume by pot size: 6-inch pot = 150-250ml, 8-inch pot = 300-400ml, 10-inch pot = 450-600ml
- Water trigger: Only water when you stick your finger 2 inches into the soil and it feels completely dry.
- Tap water hack: No expensive water filters needed. Fill a jug with tap water and let it sit open for 24 hours to off-gas chlorine before using.
- Signs of miswatering: Overwatering = yellow, mushy lower leaves; underwatering = curling leaves with crispy brown edges.
Step 3: Zero-Cost Humidity Hacks for Dry Apartment Air
Meeting rubber plant humidity needs doesn’t require a costly humidifier. Use these household hacks to hit the 35-55% target:
- Pebble tray: Grab an old takeout container, fill it with pebbles or clean rocks from your yard, add water until it’s just below the top of the pebbles, and set your plant pot on top. Evaporating water adds localized humidity without raising your electric bill.
- Group planting: Cluster your rubber plant with other houseplants you already own. Plants release moisture through transpiration, creating a naturally more humid microclimate for all of them.
- Room rotation: Once a week, move your rubber plant to the bathroom while you take a hot shower, or to the kitchen while you cook, to expose it to 1-2 hours of extra humidity for free.
Step 4: DIY Budget Soil & Fertilizer Mixes
These cheap rubber plant care hacks cut supply costs by 80% compared to branded products, while delivering the exact drainage and nutrients your rubber plant needs:
- Rubber plant soil mix budget recipe: Mix 70% dollar store general potting mix with 30% perlite (or crushed styrofoam from shipping packaging, if you have no perlite) for fast drainage. This mix costs less than $2 per 2 gallons, compared to $10+ for branded Ficus soil.
- Free fertilizer: Instead of buying specialized rubber plant fertilizer, save finished kitchen compost (coffee grounds, chopped banana peels, vegetable scraps that have broken down for 3+ months) and add 1 tablespoon to the top of the soil twice a year, in early spring and mid-summer. This provides all the nutrients your plant needs to grow faster, for zero cost.
Seasonal Care Calendar (4 Seasons)
Adjust your care routine to match seasonal apartment conditions to keep your plant resilient year-round:
- Spring: Water every 7-10 days, move the plant to a brighter spot if you relocated it for winter, add 1 tbsp of compost to trigger new growth. This is the best time to learn how to make rubber plant grow faster on budget, as growth rates peak in spring.
- Summer: Follow rubber plant summer watering guidelines: water every 5-7 days, keep the plant at least 2 feet away from AC vents, rotate 1/4 turn every 2 weeks for even growth.
- Fall: Reduce watering to every 10-14 days, stop adding compost, move the plant away from drafty windows as temperatures drop.
- Winter: Follow rubber plant winter care rules: water every 14-21 days, keep the plant 3 feet away from hot heating vents, skip all fertilizer to avoid salt buildup in soil.
Common Budget Care Mistakes That Harm Rubber Plants
Avoid these easy-to-make errors that cause avoidable damage and extra costs:
- Mistake: Planting directly in no-drainage dollar store pots to save money. What happens: Excess water pools at the bottom of the pot, causing root rot that can kill your plant in 2-3 weeks. Instead: Drill a 1/4 inch hole in the bottom of the decorative pot with a standard household drill, or keep the plant in its original nursery plastic pot inside the decorative pot, and empty any excess water 10 minutes after watering.
- Mistake: Overfertilizing with cheap generic liquid plant food to speed up growth. What happens: Salt buildup in soil burns roots, leading to yellow dropping leaves (the top cause of why is my rubber plant dropping leaves queries from apartment owners). Instead: Use only free kitchen compost twice a year, per the care guidelines.
- Mistake: Placing your rubber plant directly in front of drafty vents to get closer to natural light. What happens: Rapid moisture loss from leaves causes widespread leaf drop and stunted growth. Instead: Keep the plant at least 2 feet away from all AC and heating vents, and adjust light placement as needed to hit the 10,000-20,000 lux target.
Voice Search Optimized FAQ
We answer the most common spoken queries about rubber plant care for beginners and apartment dwellers:
Can I keep my rubber plant in my apartment’s dark corner?
This is the top question for people asking can I keep rubber plant in low light apartment spaces. You can only keep it in a dark corner if the corner gets at least 10,000 lux of light (test with your free lux meter app). If light levels are lower, you’ll see leggy growth and frequent leaf drop. If you don’t have a brighter permanent spot, rotate the plant to a brighter window for 2 days a week to supplement light.
Why are my rubber plant’s lower leaves falling off in my apartment?
The most common causes are overwatering, exposure to hot or cold drafts, or sudden changes in light levels (Šrámek, 1999). First check if the top 2 inches of soil are soggy (sign of overwatering), then confirm the plant is at least 2 feet away from all vents and drafty windows, then test light levels to make sure they fall within the 10,000-20,000 lux range.
How often do I need to repot my rubber plant if I’m on a budget?
You only need to repot your rubber plant when you see roots growing out of the drainage holes, which is usually every 2-3 years for mature plants. To keep costs low, reuse old pots (just wash them thoroughly with soap and warm water first) and use your DIY budget soil mix, so each repot costs less than $5. You can also trim back overgrown roots by 10% to keep the plant smaller if you have limited apartment square footage.
30-Day Resilience Challenge Checklist
Print this zero-cost checklist to get your rubber plant on track for lush, steady growth in 30 days:
- Daily: 10-second visual check for discolored leaves, drooping, or pest activity
- Day 3: Test light levels at midday with a free lux meter app, adjust placement if needed
- Day 7: Do the 2-inch finger soil test, water with the appropriate volume for your pot size if dry
- Day 10: Test apartment humidity with your phone’s built-in humidity sensor or a cheap $1 analog meter, set up a pebble tray if levels are below 35%
- Day 14: Rotate the plant 1/4 turn to promote even growth on all sides
- Day 17: If it’s spring or summer, add 1 tablespoon of finished kitchen compost to the top of the soil
- Day 21: Check drainage holes for protruding roots to see if repotting is needed in the next 3 months
- Day 24: Wipe leaves with a damp cotton cloth to remove dust (improves light absorption, no expensive leaf shine products needed)
- Day 30: Take a photo of your plant to track growth, and adjust your care routine based on any changes you observed over the month
References
- ASPCA. (2026). Toxic and Non-Toxic Plants List — ASPCA. https://www.aspca.org/pet-care/animal-poison-control/toxic-and-non-toxic-plants. Accessed 2026-03-01.
- Šrámek, F. (1999). Vaughan, M.J.: The Complete Book on Cut Flower Care. Biologia plantarum. https://doi.org/10.1023/a:1001770114931. Accessed 2026-03-01.
- Hayashi, Y. (2009). Production of natural rubber from Para rubber tree. Plant Biotechnology. https://doi.org/10.5511/plantbiotechnology.26.67. Accessed 2026-03-01.
Optional Helper: Plantfun.App
Plantfun.App identifies your plants by photo, diagnoses pests and diseases with clear fixes, and creates personalised watering and light schedules that adapt to your home conditions — a handy companion for putting this guide into daily practice.
Found an error or have suggestions? We'd love your feedback.
Need help identifying this problem?
Get instant identification, personalized care schedules, and effective pest treatment plans directly on your phone.
Sponsored • We may earn a commission from app downloads
Related Guides
The Complete Rubber Plant Care Checklist for Resilient Growth in Small Urban Apartments
Stop stunting your rubber plant’s growth in your apartment. Get 8 actionable care steps, exact light and water thresholds, and a free printable checklist for lush, resilient foliage year-round.
Care GuideThe Complete Rubber Plant Care Checklist for Year-Round Resilient Growth in Typical Apartments
Grow a lush, unkillable rubber plant in your apartment. Get exact light levels, watering amounts, and a free seasonal checklist to avoid yellow leaves and stunted growth all year long.
Care GuideThe Complete Ficus Elastica (Rubber Plant) Care Guide for Small Apartments: Get Lush Resilient Growth
Grow a lush, resilient rubber plant even in your small apartment. Get exact light levels, watering amounts, and space-saving tips for glossy, low-fuss foliage that won’t outgrow its nook.
Pest ControlAnts on Plants: What They Mean and What to Do
Ants usually aren't eating your plant. They are farming other pests.