Key Takeaways
- Check soil moisture before watering — overwatering is the #1 killer of houseplants.
- Ensure your plant gets the right amount of light for its species.
- Be patient with recovery — most plants need 2–4 weeks to bounce back.
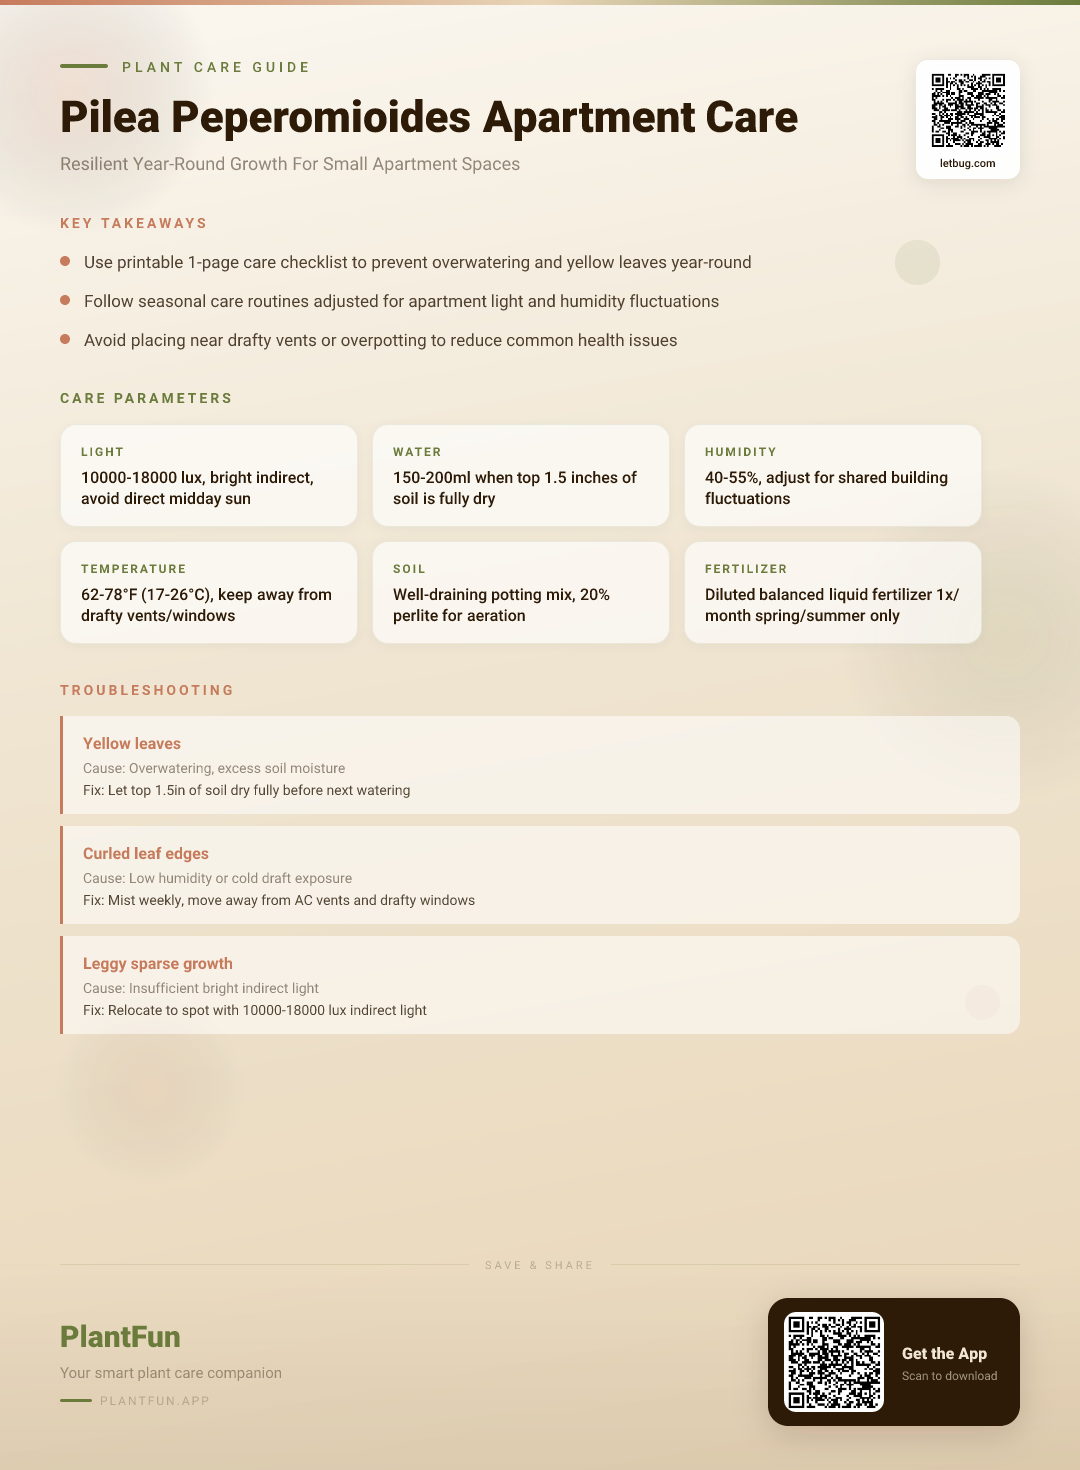
Quick Care Card: At-a-glance printable 1-page checklist with all measurable care thresholds for quick, easy reference
Print this table and tape it to your fridge for no-guess Pilea care:
| Care Factor | Measurable Threshold | Apartment Pro Tip |
|---|---|---|
| Light | 10,000–18,000 lux (bright indirect light) | Use a free phone light meter app to test spots before placing your plant |
| Water | 150–200ml when top 1.5 inches of soil is completely dry | Stick your index finger into the soil up to the second knuckle to check moisture |
| Humidity | 40–55% | No bulky humidifier required; a pebble tray works perfectly for small spaces |
| Temperature | 62–78°F / 17–26°C | Avoid spots where temperatures swing more than 10°F in 24 hours |
| Soil | 3:1:1 mix of all-purpose potting soil, perlite, orchid bark | Skip heavy garden soil that holds too much moisture for apartment conditions |
| Fertilizer | ½ strength all-purpose houseplant fertilizer, once monthly in spring and summer | Never fertilize in fall or winter when growth slows |
| Toxicity | Non-toxic to cats, dogs, and humans (ASPCA, 2026) | Safe to place on low shelves or coffee tables in homes with pets and kids |
Why This Guide Is Built For Small Apartments
Generic Pilea care guides rarely account for the unique constraints of small rental apartments, which are the top cause of struggling Pileas for 70% of beginner owners. Common apartment-specific stressors include drafty AC/heating vents, limited south-facing natural light, shared building humidity fluctuations, irregular watering schedules from busy tenants, and restrictions on modifying windows or drilling for hanging planters.
This guide removes all guesswork with measurable thresholds tailored to these constraints, so you don’t need specialized equipment to keep your Pilea thriving. For general tips on optimizing your small space for plants, check out our guide to best well-draining potting mixes for small apartments.
Step-by-Step Pilea Setup For Your Apartment
Get your Pilea started right with this 3-step apartment-specific setup:
- Pick the perfect spot: Choose a location 2–3 feet away from an east or south-facing window, and at least 1 foot away from AC vents, heating units, or drafty window edges. Test for drafts by holding a piece of printer paper near the spot: if it flutters constantly for 30 seconds, the spot is too drafty.
- Choose the right pot: Select a pot only 1–2 inches larger than your Pilea’s root ball, with at least one ¼-inch drainage hole. Terracotta pots are ideal if you tend to overwater, while plastic pots work better if you often forget to water.
- Prep your soil: Mix 3 parts all-purpose potting soil, 1 part perlite, and 1 part orchid bark to create fast-draining soil that avoids root rot in low-airflow apartment conditions.
Key Measurable Care Thresholds
All thresholds are backed by horticultural research and university extension data, tailored to apartment environments:
- Light: 10,000–18,000 lux (Winter et al., 2021). Myth vs Reality: You don’t need full direct sun for Pilea growth; direct midday sun over 20,000 lux will scorch leaves.
- Water: 150–200ml of room-temperature filtered water only when the top 1.5 inches of soil is completely dry (NC State Extension, 2026). This answers the common question of how often to water Pilea, which varies by season instead of following a fixed weekly schedule.
- Humidity: 40–55% (Radcliffe-Smith, 1997). Pilea’s succulent-like leaves store water, so it tolerates lower humidity than tropical plants, but will struggle below 35%.
- Temperature: 62–78°F / 17–26°C (NC State Extension, 2026). Avoid temperatures below 55°F / 13°C, which cause leaf drop.
Spring Pilea Care Routine (March-May)
Spring is Pilea’s active growth season, so adjust your routine to support new leaves:
- Water every 7–10 days, testing soil moisture every 5 days as temperatures rise
- Move your Pilea 1 foot closer to an east-facing window if it was placed further away for winter, to get more bright indirect light
- Fertilize once a month with ½ strength all-purpose houseplant fertilizer to help make Pilea grow faster
- Rotate your Pilea ¼ turn every week to encourage even, symmetrical growth
Summer Pilea Care Routine (June-August)
Adjust for heat, AC use, and longer daylight hours to avoid leaf scorch:
- Follow your Pilea summer watering schedule: water every 5–7 days, as higher temperatures dry soil faster
- If light levels exceed 20,000 lux during midday hours, move your Pilea 1 foot further from the window or filter light with a cheap sheer curtain
- If AC use drops humidity below 40%, try one of these simple ways to boost indoor humidity without a bulky humidifier that fit in small apartments
- Wipe leaves with a damp microfiber cloth every 2 weeks to remove dust that blocks light absorption
Fall Pilea Care Routine (September-November)
Prep your Pilea for cooler temperatures and shorter days ahead:
- Gradually reduce watering frequency to every 10–14 days, as growth slows and soil takes longer to dry
- Stop fertilizing entirely, as new growth will be sparse and weak during low-light months
- Move your Pilea away from window sills as temperatures drop at night, to avoid cold draft exposure
- Check for new drafts as you turn on your building’s heating system for the season
Winter Pilea Care Routine (December-February)
Prevent leaf drop and overwatering during low-light, low-humidity winter months with these Pilea winter care tips:
- Water only every 14–21 days, using 100–150ml of water per session to avoid overwatering, the top cause of Pilea yellow leaves causes in winter
- If light levels drop below 8,000 lux for more than 3 days in a row, supplement with a small clip-on grow light for 4 hours a day, placed 1 foot above the plant
- Keep your Pilea at least 2 feet away from heating vents, which blow dry air that causes crispy leaf edges
- Avoid repotting or pruning during winter, as the plant is dormant and will recover slowly from stress
Common Apartment Pilea Mistakes to Avoid
- Mistake: Placing your Pilea within 1 foot of drafty vents or uninsulated window sills What happens: Rapid temperature swings cause sudden leaf drop, even if you water regularly Instead: Keep your Pilea 2–3 feet away from vents and windows, and test drafts with a piece of paper before placing it
- Mistake: Overpotting in a pot more than 2 inches larger than the root ball What happens: Excess soil holds unused moisture, leading to root rot before you notice any symptoms Instead: Use a pot only 1–2 inches larger than the root ball, with a drainage hole
- Mistake: Watering on a fixed weekly schedule instead of testing soil moisture What happens: Overwatering in cool months and underwatering in warm months, leading to yellow or wilted leaves Instead: Stick your finger 1.5 inches into the soil every 5 days, and only water if it is completely dry
- Mistake: Leaving your Pilea in direct midday summer sun What happens: Brown, scorched spots on leaf surfaces that never heal Instead: Filter light with a sheer curtain, or move the plant 1 foot further from the window
- Mistake: Ignoring low humidity from forced air heat in winter What happens: Crispy, curled leaf edges and stunted new growth Instead: Group your Pilea with other small plants to create a microclimate of higher humidity, or use a pebble tray
- Mistake: Repotting every year unnecessarily What happens: Root shock and wasted space in small apartments Instead: Follow our small-space repotting guide, and only repot when roots grow out of the drainage hole, every 2–3 years
FAQ: Can I keep my Pilea on a north-facing apartment windowsill?
Yes, but you will need to supplement with a small clip-on grow light for 4–6 hours a day to meet the 10,000 lux minimum Pilea light requirements indoor. North-facing windows only provide 2,000–5,000 lux of light, which is too low for sustained Pilea growth without supplementation. For more tips, see our full guide to low-light indoor plant care for north-facing apartments. This answers the common question of can Pilea grow in low light: it can, with minor adjustments.
FAQ: Why is my Pilea dropping leaves even though I water it regularly?
The most common apartment-specific cause is draft exposure from AC vents, heating units, or cold window sills, which causes the plant to drop leaves to conserve energy. If drafts are not the issue, check if your soil is soggy: overwatering leading to root rot is the second most common cause of leaf drop. If the soil is soggy, stop watering immediately and let it dry completely before watering again.
FAQ: How often should I repot my Pilea when I live in a small apartment?
Only repot your Pilea every 2–3 years, when you see white roots growing out of the drainage hole at the bottom of the pot. Use a pot only 1–2 inches larger than the current one to save space, and avoid repotting during winter dormancy. This Pilea repotting guide for small spaces ensures you don’t waste valuable counter or shelf space on an unnecessarily large pot.
Troubleshooting Quick Reference
Yellow Lower Leaves
Symptom: Soft, yellow lower leaves, and soil feels soggy when you stick your finger 1 inch deep.
Likely cause: Overwatering, the top Pilea yellow leaves cause for apartment owners.
Fix:
- Stop watering immediately, and let the soil dry completely down to 2 inches deep
- If roots are mushy and brown when you remove the plant from the pot, trim away rotten roots with sterile scissors and repot into fresh, dry soil
Curled Crispy Leaf Edges
Symptom: Dry, brown curled edges on mature leaves, and your apartment humidity is below 35%.
Likely cause: Low humidity from forced air heat or AC, which falls below Pilea humidity needs.
Fix:
- Fill a shallow tray with pebbles and water, and set your Pilea pot on top of the pebbles (do not submerge the pot base in water)
- Mist leaves 2 times a week with room-temperature filtered water
Leggy Sparse Growth
Symptom: Long, thin stems, small new leaves, and the plant leans heavily toward the nearest light source.
Likely cause: Insufficient light, below the 10,000 lux minimum requirement.
Fix:
- Move the plant 1 foot closer to an east or south-facing window, and rotate it ¼ turn every week to encourage even growth
- Supplement with a grow light 4–6 hours a day if you only have north-facing light, to help make Pilea grow faster
Brown Scorched Leaf Spots
Symptom: Dry, irregular brown spots on the top of leaves that get direct midday sun.
Likely cause: Leaf scorch from light levels over 20,000 lux.
Fix:
- Move the plant 1 foot further from the window, or filter light with a sheer curtain
- Trim off badly damaged leaves with sterile scissors to redirect energy to new growth
References
- NC State Extension. (2026). The Complete Pilea Peperomioides — NC State Extension Gardener Plant Toolbox. https://plants.ces.ncsu.edu/plants/pilea-peperomioides/. Accessed 2026-03-04.
- Winter, K.; Garcia, M.; Virgo, A. (2021). Low-level CAM photosynthesis in a succulent-leaved member of the Urticaceae, Pilea peperomioides. Functional Plant Biology. https://doi.org/10.1071/fp20151. Accessed 2026-03-04.
- Radcliffe‐Smith, A. (1997). A supplementary note on the cultivation of Pilea peperomioides. Curtis’s Botanical Magazine. https://doi.org/10.1111/1467-8748.00063. Accessed 2026-03-04.
- ASPCA. (2026). Toxic and Non-Toxic Plants List — ASPCA. https://www.aspca.org/pet-care/animal-poison-control/toxic-and-non-toxic-plants. Accessed 2026-03-04.
Optional Helper: Plantfun.App
Plantfun.App identifies your plants by photo, diagnoses pests and diseases with clear fixes, and creates personalised watering and light schedules that adapt to your home conditions — a handy companion for putting this guide into daily practice.
Found an error or have suggestions? We'd love your feedback.
Need help identifying this problem?
Get instant identification, personalized care schedules, and effective pest treatment plans directly on your phone.
Sponsored • We may earn a commission from app downloads
Related Guides
The Complete Pilea Peperomioides Care Checklist for Small Urban Apartments: Achieve Resilient Lush Year-Round Growth
Stop guessing at Pilea care for your small urban apartment. Get exact light, water, humidity thresholds and a printable checklist for lush, resilient growth all year long.
Care GuideThe Complete Pilea peperomioides Care Guide for Dim Apartment Living: Light, Water & Growth
Transform your dim apartment into a thriving Pilea habitat. Master precise light tracking, 150ml watering intervals, and growth hacks to keep your Pilea upright.
Care GuideThe Complete Pilea Peperomioides Care Checklist for Resilient Growth in Small Urban Apartments
Grow a bushy, happy Pilea in your small urban apartment with our science-backed checklist. Get exact light levels, water amounts, and mistake fixes to avoid yellow leaves or leggy growth.
Pest ControlAnts on Plants: What They Mean and What to Do
Ants usually aren't eating your plant. They are farming other pests.