Key Takeaways
- Check soil moisture before watering — overwatering is the #1 killer of houseplants.
- Ensure your plant gets the right amount of light for its species.
- Be patient with recovery — most plants need 2–4 weeks to bounce back.
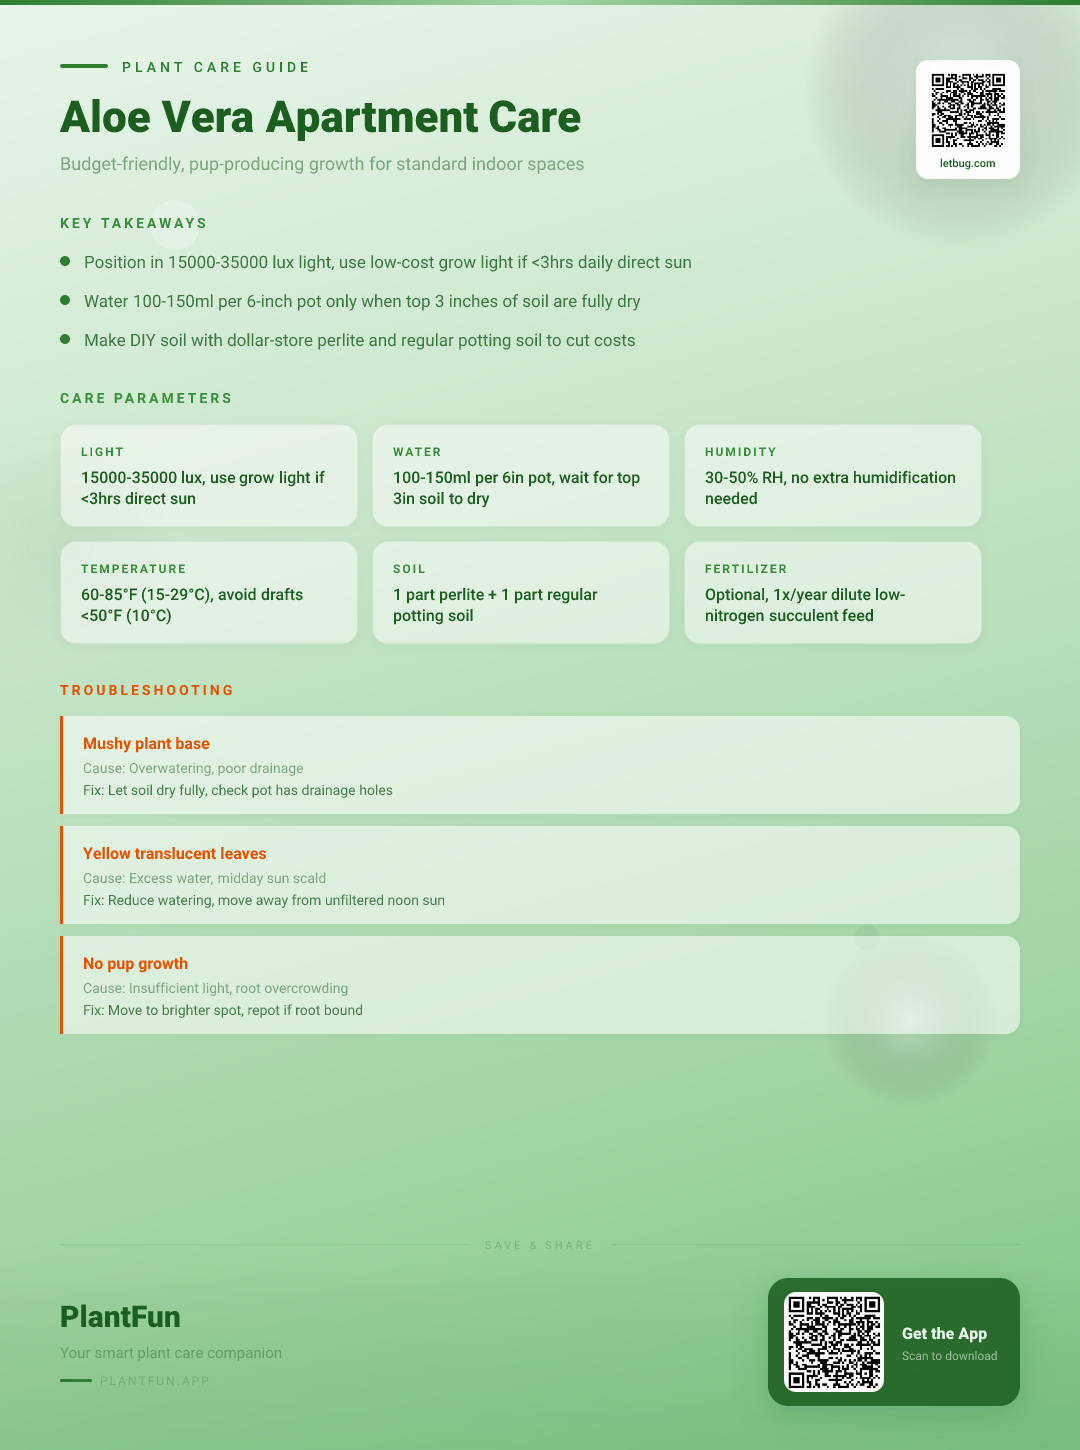
Quick Care Card: At-a-glance cheat sheet with all measurable care thresholds for apartment aloe, no fluff
| Care Factor | Measurable Threshold | Apartment-Specific Notes |
|---|---|---|
| Light | 15,000–35,000 lux | Equivalent to 3–6 hours of direct daily sun |
| Water | 100–150 ml per 6-inch pot | Only water when top 3 inches of soil are completely dry |
| Humidity | 30–50% RH | No humidifier required for standard apartments |
| Temperature | 60–85°F (15–29°C) | Avoid exposure to temps below 50°F (10°C) |
| Soil | 1:2 perlite to all-purpose potting soil | Total cost <$5 for enough mix for 3 6-inch pots |
| Fertilizer | No regular feeding required | Optional weak coffee ground tea once per year maximum |
| Toxicity | Mildly toxic to cats and dogs | Keep leaves and harvested gel away from pets (ASPCA, 2026) |
Why This Guide Works for Your Typical Apartment
Generic aloe care guides are written for greenhouse or outdoor growing conditions, which almost never match the constraints of a standard 1-2 bedroom U.S. apartment. We built this checklist specifically for renters dealing with no-drill rules, dry forced air from heating/AC systems, low-light north-facing windows, and a monthly plant care budget of $20 or less. No overpriced specialty succulent soil, fancy grow lights, or expensive humidifiers are required — we use household items you already own for 90% of care tasks.
Step 1: Light Placement for Apartment Aloe
Aloe vera has a strict 15,000–35,000 lux light requirement for healthy growth and pup production (Plant Science Archives, 2019). The best window for aloe vera in apartment setups is a south or west-facing window, with the plant placed 1–2 feet away from the glass to avoid leaf scorch from midday sun.
If your unit gets less than 3 hours of direct sun daily, use our $2 no-drill workaround: tape aluminum foil (shiny side out) to a piece of cardboard, and place it 1 foot behind the aloe to reflect ambient light back onto the plant, doubling available light levels without permanent modifications. This solves the most common question for new renters: can aloe vera grow in low light apartments?
Step 2: Budget Watering Routine (No Fancy Tools Needed)
Wondering how often to water aloe vera in apartments? The answer depends on your heating and AC cycles, but we use a simple measurable rule: give 100–150 ml of room-temperature water per 6-inch pot, only when the top 3 inches of soil are completely dry.
To test soil moisture, stick your index finger 3 inches deep into the soil, or use a clean wooden chopstick: if the chopstick comes out completely clean with no damp soil stuck to it, it’s time to water. Adjust for seasonal HVAC use: if your heater runs 24/7 in winter, you’ll only water every 3–4 weeks; if your AC runs nonstop in summer, you’ll water every 2–3 weeks as part of your aloe vera summer watering schedule.
Step 3: $5 or Less DIY Aloe Soil Mix
Skip the $15 specialty succulent soil mixes — our cheap aloe vera soil mix uses dollar-store supplies and works just as well for drainage and nutrient levels (Derbe, 2015). The recipe is:
- 1 part perlite (available for $1.25 at most dollar stores)
- 2 parts regular all-purpose potting soil ($3 for a 4-quart bag at grocery or dollar stores)
Mix the two components thoroughly before potting your aloe. This mix drains fast enough to prevent root rot, and costs less than $5 total for enough soil to fill three 6-inch pots.
Step 4: Humidity & Temperature Adjustments for Apartments
Aloe vera thrives in the standard 30–50% RH humidity range of most U.S. apartments, so aloe vera care no humidifier is required — no need to waste money on that purchase. The aloe vera temperature tolerance indoors is 60–85°F (15–29°C) (Plant Science Archives, 2019).
If you have drafty windows that drop temps below 50°F (10°C) in winter, use a free fix: tuck a rolled-up hand towel between the window sill and the base of your aloe pot to block cold drafts, or move the plant 3 feet back from the window during cold snaps.
Seasonal Care Calendar for Apartment Aloe
Adjust your care routine to match indoor seasonal conditions to encourage pup production and avoid stress:
- Winter (Dec–Feb): Follow aloe vera winter care in apartments best practices: water every 3–4 weeks, move the plant 2 feet away from heating vents to avoid drying out, and use the foil reflector if daylight hours drop below 10 per day.
- Spring (Mar–May): This is prime pup-producing season. Ensure light levels hit 20,000+ lux to trigger new pup growth (how to get aloe vera to produce pups), and water every 2–3 weeks as soil dries out faster with longer daylight.
- Summer (Jun–Aug): Follow your aloe vera summer watering schedule: water every 2 weeks, keep the plant 3 feet away from AC vents that blow cold air directly on leaves, and move it 6 inches back from west-facing windows during midday to avoid scorch.
- Fall (Sep–Nov): Gradually reduce watering to every 3 weeks, move the plant closer to windows as daylight shortens, and skip all fertilizing.
Common Budget Care Mistakes to Avoid
These are the 4 most frequent errors new aloe vera care for beginners make using household items that harm their plant:
- Mistake: Adding leftover coffee grounds directly to the soil to “fertilize” for free What happens: Coffee grounds raise soil acidity too high and hold excess moisture, leading to root rot Instead: If you want to add nutrients, steep 1 tbsp of used coffee grounds in 1 gallon of water, and use that diluted mix to water once per year at most
- Mistake: Following an outdoor once-per-week watering schedule for your indoor aloe What happens: Overwatering is the #1 cause of the common issue: why is my aloe vera turning mushy Instead: Always test the top 3 inches of soil first, only water when completely dry, regardless of a set schedule
- Mistake: Using a pot without drainage holes to avoid damaging your apartment counter What happens: Excess water pools at the bottom of the pot, leading to root rot in as little as 2 weeks Instead: Add a 1-inch layer of pebbles at the bottom of the no-drain pot before adding soil, or place a $1 plastic drip tray under a drained pot to catch excess water
- Mistake: Repotting your aloe every 6 months like other houseplants What happens: Aloe prefers to be root-bound; frequent repotting shocks the plant and stops pup production Instead: Repot only when roots are growing out of the drainage holes, every 2–3 years at most
FAQ: Why is my apartment aloe turning mushy at the base?
This is almost always caused by overwatering or poor drainage (Plant Science Archives, 2019). First, stop watering immediately. Pull the plant out of the pot, cut off any black, mushy roots with a clean pair of scissors, repot in fresh dry DIY soil mix, and don’t water for 2 weeks. Make sure your pot has drainage holes, or you have a 1-inch pebble layer at the bottom if using a no-drain pot.
FAQ: Can I grow aloe in my apartment window that only gets 2 hours of sun a day?
Yes! First, use the $2 aluminum foil reflector trick to bounce extra light onto the plant: tape aluminum foil shiny side out to a piece of cardboard, place it 1 foot behind the aloe to double the available light. Rotate the plant ¼ turn every 2 weeks to ensure all sides get equal light. If you notice the leaves stretching and turning pale green, you can upgrade to a $10 clip-on LED grow light (no drill needed, clips to the window sill) for 4 hours a day, which fits well under your $20 monthly budget.
FAQ: How do I harvest aloe gel from my apartment plant without killing it?
Follow these simple steps for how to harvest aloe gel safely: 1. Only harvest leaves from the bottom ⅓ of the plant, choose thick, plump leaves that are at least 8 inches long. 2. Cut the leaf off at the base with a clean, sharp knife, don’t tear it. 3. Let the yellow sap (called aloin) drain out of the cut end for 10 minutes, this sap can irritate skin. 4. Peel off the outer green layer to access the clear gel inside. Never harvest more than 3 leaves at a time, and wait at least 2 months between harvests to let the plant recover. Note that aloe is mildly toxic to cats and dogs if ingested (ASPCA, 2026), so keep harvested gel and cut leaves away from pets.
References
- American Society for the Prevention of Cruelty to Animals. (2026). Toxic and Non-Toxic Plants List — ASPCA. https://www.aspca.org/pet-care/animal-poison-control/toxic-and-non-toxic-plants. Accessed 2026-02-26.
- Plant Science Archives. (2019). Aloe vera plant products as antimicrobial agents. Plant Science Archives. https://doi.org/10.33680/plsa.2019.016. Accessed 2026-02-26.
- Derbe, T. (2015). Spectroscopic Investigation of Metal Level in Aloe Vera Plant, and the Soil Where the Aloe Vera Grows: Arba Minch, Southern Ethiopia. Modern Chemistry. https://doi.org/10.11648/j.mc.20150301.11. Accessed 2026-02-26.
Optional Helper: Plantfun.App
Plantfun.App identifies your plants by photo, diagnoses pests and diseases with clear fixes, and creates personalised watering and light schedules that adapt to your home conditions — a handy companion for putting this guide into daily practice.
Found an error or have suggestions? We'd love your feedback.
Need help identifying this problem?
Get instant identification, personalized care schedules, and effective pest treatment plans directly on your phone.
Sponsored • We may earn a commission from app downloads
Related Guides
Aloe Vera in Typical Low-Light Apartments: The Only Care Checklist You Need for Resilient Growth
Grow plump, healthy aloe vera even in a dim apartment. Get our science-backed 8-point care checklist, exact light/water thresholds, and easy fixes for common symptoms.
Care GuideAloe Vera in Small Urban Apartments: The Only Resilient Growth Checklist You’ll Ever Need
Grow plump, gel-rich Aloe Vera in your apartment without expensive supplies. Get exact light, water, and soil parameters plus a free seasonal care checklist to keep your plant thriving.
Care GuideThe Complete Aloe Vera Care Checklist for Typical Apartments: Grow Resilient Plump Plants Year-Round
Stop growing floppy, brown-tipped aloe in your apartment. Get exact light levels, watering amounts, and a seasonal checklist for plump, resilient aloe growth all year.
Pest ControlAnts on Plants: What They Mean and What to Do
Ants usually aren't eating your plant. They are farming other pests.